✿¸.•´ི♥All About Me♥ྀ `•.¸✿

- ✿¸.•´ི♥Sexy Ash♥ྀ `•.¸✿
- Mackay, QLD, Australia
- Heya..Im Sexy Ash and im addicted to psp heehee.. ive been psping for about 5 or so yrs now and i love it.. Im a mum of a beautiful 5 yr old Hannah and she occupies most of my time. So i use psp to escape lol. Here ull find all my Tuts and Temps. If you have any questions please feel free to ask me!!
✿¸.•´ི♥TOU♥ྀ `•.¸✿
The creation, concept, and ideas of these tutorials is of my own imagination and design.
Should anything resemble another tutorial, this is only pure coincedence.
DO NOT copy my tutorials anywhere on the web or claim as your own!
I DO NOT give permission for my tutorials to be translated.
Please NO hotlinking, this is bandwidth theft!
DO NOT use my tutorials/ideas/supplies for commercial use or any other monetary gain
✿¸.•´ི♥Chat Box♥ྀ `•.¸✿
✿¸.•´ི♥Lables♥ྀ `•.¸✿
- Addictive Pleasures - Tutorial
- Collab Templates
- Crafty Chick Exclusive Tag Templates
- FTU tutorial
- Juicy Bits Exclusive Tag Template
- Misfit - Templates
- No Scraps Tutorial
- Pink Pleasure - Tutorial
- Pink Princess Scraps - Tutorial
- PMTWS - Tutorial
- Scraps With Attitude - Tutorial
- Tag Template
- Toxic Desirez - Tutorial
✿¸.•´ི♥Music♥ྀ `•.¸✿
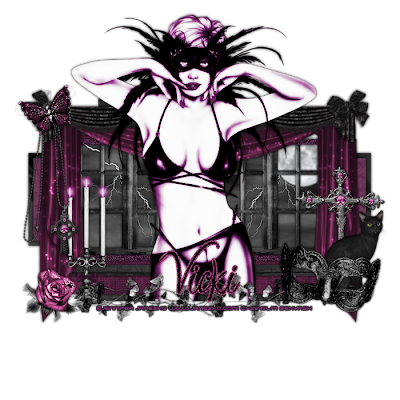
 Nocturnal Slumber
 This tutorial is for those that have a working knowledge of Psp.
Supplies needed:
Tube of choice.
I’m using the artwork of Jennifer Janesko. You have to purchase a license to use her work at CILM
Nocturnal Clumber by Vicki and can be purchased at Pink Princess Scraps
Template # 29 by Me
Ok lets gets started
Open Temp - Change canvas size to 700 by 700
Delete Circles and Stars.
Copy paste your tube and place in the middle - duplicate and colourise to match the colours of your kit - change blend mode to soft light. Back on the original colourise to hue - 0 and sat - 0 and add a dropshadow.
Add papers to the shapes in your temp - do this by selecting the shape - float - defloat - copy - paste a paper - invert - delete - select none - delete original.
On raster 2 add Mura's Cloud effect with colours from your kit.
Elements
49- resize by 80% and place where mine is - drag layer under the tube.
13 - resize by 50% - place on the left over the curtains.
46- resize by 50% - rotate by 20% left and place over the top of the chain to element 13.
32 - resize by 50% - rotate 10% right nd place in the right bottom corner.
10 - resize by 50% twice and Guassian Blur by 1 - add dropshadow - drag the moon under the curtain in the top right corner.
20 - resize by 50% and place in the cloud rectangle - duplicate and mirror - delete excess.
18 - Resize by 50% and then 80% - place over the cloud rectangle on the left - duplicate - mirror - merge together and delete excess - drag this layer under the curtains.
54 - resize 80% and plave over the bottom of your tube.
52 - resize by 50% twice - sharpen and place on the bottom left corner.
41 - Resize by 50% twince and place under the mask on the right.
38 - Resize by 50% - place under cat.
34 - Resize by 50% and place where mine is.
Add your copyright and license number and name.
Then to save with a transperent background you just hide the white background - merge visable - delete the white background - then save as .png
Finished
Thankyou
This tut was created in March 2010
0 comments:
Post a Comment