✿¸.•´ི♥All About Me♥ྀ `•.¸✿

- ✿¸.•´ི♥Sexy Ash♥ྀ `•.¸✿
- Mackay, QLD, Australia
- Heya..Im Sexy Ash and im addicted to psp heehee.. ive been psping for about 5 or so yrs now and i love it.. Im a mum of a beautiful 5 yr old Hannah and she occupies most of my time. So i use psp to escape lol. Here ull find all my Tuts and Temps. If you have any questions please feel free to ask me!!
✿¸.•´ི♥I CT For♥ྀ `•.¸✿


✿¸.•´ི♥Music♥ྀ `•.¸✿


Tuesday, September 29, 2009
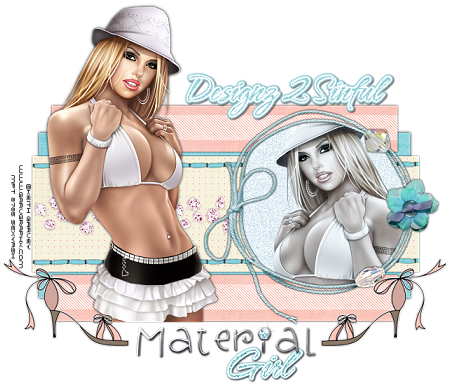
 Material Girl
This tutorial is for those that have a working knowledge of Psp.
Supplies needed:
Tube of choice. I’m using the artwork of Keith Garvey. You have to purchase a license to use his work at MPT
Mterial Girl Scrapkit - is made by Sarah and Danielle at pimp my tags with scraps
Template # 11 by Sylvie - download from her blog here
ok here we go...
Open your template in psp and change the canvas size to 600 by 600 to give you more room to work.
Open your template in psp and change the canvas size to 600 by 600 to give you more room to work.
Now Delete the wording, martini glass, white square and smallest black rectangle.
Cope and paste your tube onto yout tag and delete excess - add Xero Radience with these settings 245,120,78,155. Add dropshadow
Then click on the grey rectangle select all - float - defloatand copy - paste a paper of choice invert - delete. Add dropshadow and delete original layer.
Now on the moddle rectangle on the top add a paper or colour then use Weave with these settings 1,8,1 and colour of choice. Add dropshadow and delete original layer.
Next you want to select the top thinner rectangle and add a paper of choice. On that paper layer you want to grab your selection tool set on rectangle and draw out a rectangle in the middle of the papered rectangle. Now useing Penta's Jeans add useing the settings on 62-4.
Repeat for the bottom rectangle aswell. Then add a dropshadow to both
Then copy - paste the bejeweled string frame from your kit and place where the white square was originally and fill with a paper of choice. Now either useing the same or a different tube also put that into your frame and delete excess. Now select your tube and duplicate it, on the duplicated copy add guassian blur set at 3 and change the blend mode to soft light. Then on your original tube change the blend mode to Luminance (legacy).
Copy and paste the gemstone border and colourise to suit your tag and place in the middle of the rectangle in the top in the middle.
Now useing the stitching colourise if needed and place where the black dotted lines are and delete the dotted lines. Delete excess stitching.
Now finish up your tag with extra elements of choice.
Add your copyright and license number and name
Then to save with a transperent background you just hide the white background - merge visable - delete the white background - then save as .png
Finished
Thankyou
This tut was created on sep 2009
Then to save with a transperent background you just hide the white background - merge visable - delete the white background - then save as .png
Finished
Thankyou
This tut was created on sep 2009

Subscribe to:
Post Comments (Atom)
✿¸.•´ི♥Blinkie♥ྀ `•.¸✿

✿¸.•´ི♥Forums I Love♥ྀ `•.¸✿


✿¸.•´ི♥Blog Buds♥ྀ `•.¸✿


0 comments:
Post a Comment