✿¸.•´ི♥All About Me♥ྀ `•.¸✿

- ✿¸.•´ི♥Sexy Ash♥ྀ `•.¸✿
- Mackay, QLD, Australia
- Heya..Im Sexy Ash and im addicted to psp heehee.. ive been psping for about 5 or so yrs now and i love it.. Im a mum of a beautiful 5 yr old Hannah and she occupies most of my time. So i use psp to escape lol. Here ull find all my Tuts and Temps. If you have any questions please feel free to ask me!!
✿¸.•´ི♥I CT For♥ྀ `•.¸✿


✿¸.•´ི♥Music♥ྀ `•.¸✿


Monday, February 15, 2010
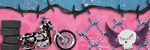
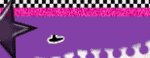
 Dont Touch

This tutorial is for those that have a working knowledge of Psp.
Supplies needed:
Supplies needed:
Tube of choice. I’m using the artwork of Keith Garvey. You have to purchase a license to use his work at MPT
PeepShow kit is made by Sarah and Tammykat and can be purchased at PMTWS site Here
Template #53 by Rose- download for free from her blog Rose's Place
Ok lets gets started
Open Temp and change canvas size to 700 by 700
Take your tube and place it ontop of the 'dont touch' wordart and add a dropshadow.
Useing your closeup tube place it over the two squares in the middle of your temp. Duplicate and on the original select the square on the left and delete excess - then on the duplicated layer delete the excess that overhangs on the right square. Then place the right square and closeup over the left square and closeup.
Now copy and paste a paper from your kit and fill the square on the right - delete excess
Do the same to the left square and then One square at a time select all - modify - contract by 3 - invert and add 50% noise.
Then back on the closeup tubes add Xero-Radiance with default settings and change the blend mode to luminace (legacy) and turn the opacty to 50%. Then add blinds 3,10,black to each of the sections of the closeup tube.
Now take the double frame from the kit and place over the 2 rectangles in the background and then delete those 2 rectangles. Add a paper to the middle of the frame and then add a dropshadow to the frame.
Add 2 different paper to the small circles on the right and add 100% noise to the bottom circle and add a dropshadow.
Select the 'dont touch' wordart - copy n paste a paper from your kit - invert - delete - inver again - modify - contract by 3 - invert - add 100% noise.
Then add 100% noise to the stars on the rectangle.
Onto the rectangle add a paper or papers of choice and delete excess.
Add a colour or paper to the 'what you cant afford' wording and add 50% noise and a gradient glow.
Lastly take the S-Sexy wordare and resize by 80% and place over the black bow of the double frame and useing a diamond of choice place that over the top of the bows where they match up in the middle.
Add your copyright and license number and name.
Then to save with a transperent background you just hide the white background - merge visable - delete the white background - then save as .png
Finished Thankyou
This tut was created in Feb 2010
Then to save with a transperent background you just hide the white background - merge visable - delete the white background - then save as .png
Finished Thankyou
This tut was created in Feb 2010

Subscribe to:
Post Comments (Atom)
✿¸.•´ི♥Blinkie♥ྀ `•.¸✿

✿¸.•´ི♥Forums I Love♥ྀ `•.¸✿


✿¸.•´ི♥Blog Buds♥ྀ `•.¸✿


0 comments:
Post a Comment