✿¸.•´ི♥All About Me♥ྀ `•.¸✿

- ✿¸.•´ི♥Sexy Ash♥ྀ `•.¸✿
- Mackay, QLD, Australia
- Heya..Im Sexy Ash and im addicted to psp heehee.. ive been psping for about 5 or so yrs now and i love it.. Im a mum of a beautiful 5 yr old Hannah and she occupies most of my time. So i use psp to escape lol. Here ull find all my Tuts and Temps. If you have any questions please feel free to ask me!!
✿¸.•´ི♥I CT For♥ྀ `•.¸✿


✿¸.•´ི♥Music♥ྀ `•.¸✿


Saturday, February 20, 2010
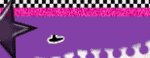
 Glamour Puss

This tutorial is for those that have a working knowledge of Psp.
Supplies needed:
Supplies needed:
Tube of choice.
I’m using the artwork of Jennifer Janesko. You have to purchase a license to use her work at CILM
Glamour Princess kit is made by the talented Tamie and can be purchased at Addictive Pleasures
Template #8 made by Me - download from my Blog
Ok lets gets started
Open Temp and delete the 2 thin rectangles in the middle.
Copy and paste your tube onto the temp and delete excess at the bottom then add Xero - Porcelain with these settings 50,128,128 and add a dropshadow.
Select the heart shape on ur temp and float - defloat - copy - paste a papers from your kit (i colourised mine) - delete - invert - modify - contract by 3 - invert - add 100% noise - select none - add dropshadow.
( the the same for the remaining rectangles)
Take a copy of your tube and place to the left she its in the heart and delete excess so it just shows in the heart shape - duplicate - mirror and add blinds 3,10 black to the tubes. Change the blend mode to Luminance (L) and the opacity to 50%.
Now select the bottom circle and copy paste a paper from the kit ur useing - inver - delete - select none and add drop shadow. Delete the smaller circle thats ontop of the large one.
Elements
Take the 'blingcurtain' and place on your canvas - resize by 70% and place so the two corners of the element line up with the top corners of the rectangle - duplicate and merge together (this makes it brighter)
Ribbon '4' - colourise and resize by 50% and place on one of the top corners of the middle rectangle - duplicate - mirror and merge together - move that layer under your tube.
Diamond - resize by 5% - sharpen and place over the bow - duplicate - mirror.
Diamond Star - Resize by 50% - duplicate - mirror and colourise the duplicated layer and then place next to the original - merge together - duplicate - mirror - Add dropshadow
Add your copyright and license number and name.
Then to save with a transperent background you just hide the white background - merge visable - delete the white background - then save as .png
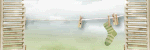
Finished
Then to save with a transperent background you just hide the white background - merge visable - delete the white background - then save as .png
Finished
Thankyou
This tut was created in Feb 2010

Subscribe to:
Post Comments (Atom)
✿¸.•´ི♥Blinkie♥ྀ `•.¸✿

✿¸.•´ི♥Forums I Love♥ྀ `•.¸✿


✿¸.•´ི♥Blog Buds♥ྀ `•.¸✿


0 comments:
Post a Comment